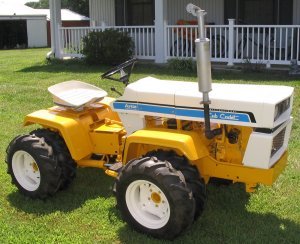
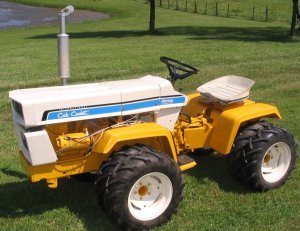
Note: I built Artie I in 2005 as described below and displayed it for several years. But, I’d always wanted a gear drive, articulated Cub Cadet, so in the spring of 2013, I completely disassembled “Artie I” and rebuilt “Artie” as a gear drive. I completed that build in the fall of 2013. You’ll find information about Artie in another article on this website. Artie I no longer exists, but hopefully you’ll find the article on the build interesting and useful.
Building An Articulate Cub Cadet (ARTIE I)
I began construction of Artie I in January of 2005. (The name was suggested by a good friend and it stuck.) I had been collecting parts for the project for several years. It seems I never take the pictures that I need during the construction phase of a project, but I’ll try to use pictures of the finished project to explain the process.
I obtained a frame and rear end from a 1650 in 2002 and a 1650 roller in 2004. I had also collected or purchased several other parts that I’d need. One of the major decisions that I’d been thinking about was the connection between the front and back half of Artie I. The connection had to
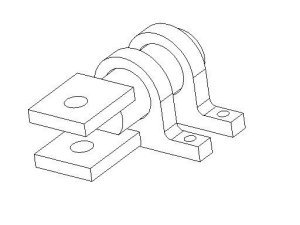
allow the two halves to turn as well as “twist”. Originally, I had planned to use two 2” pillow block bearings to allow for the twist. I even purchased two pillow block bearings to use. But this arrangement just turned out to be too big and too cumbersome. So I purchased a Category 2 lift arm weld on end for the bottom connection and a Category 0 top link to connect the section at the top. This made for a nice compact connection that worked well. The only problem is that it does allow the front end to “dip” slightly as you turn, but the dip turns out to be unnoticeable.
It may seem strange, but I began the project by making the rear end. To save a little work, I used the original mounting holes for the 1650 rear end and cut the frame so that it was 24 inches long. Basically, the length of the rear end was just long enough to contain the 1650 rear end and hydrostat and allow for a seat. Ideally, I wanted the length from the center of the rear axle to the pivot point to be as close to 21 ½” as possible. That would put the pivot point right at the center of the 43” wheelbase.
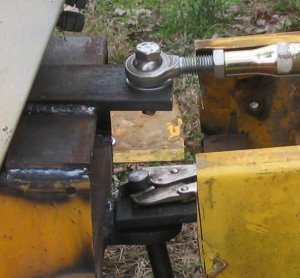
I mounted the rear end with the hydrostat extending rearward to allow for a shorter length for the rear section of Artie I. Originally I tack welded a 2” by 2” piece of tubing to connect the two sides of the frame. The tubing was positioned at the front bottom section of the frame as you can see in the picture. I welded a ½” by 3” section of flat to the 2” by 2” tubing and drilled a 1” diameter hole in it to later connect to the front section. I c-clamped a 1/2” by 3” flat iron across the top of the two frame channels and drilled a 5/8” hole in the center to mount one end of the third link. I originally c-clamped the flat iron in place so that the location could be adjusted when I later connected the two halves and finalized the design. The bottom part (the 2” by 2” tubing) of the construction eventually had to be changed.
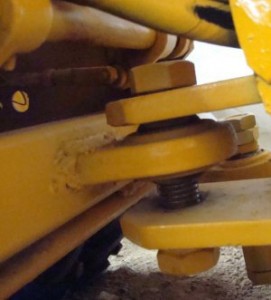
After getting the rear section of Artie I where I wanted it, I started on the front section. I wanted to keep the original 43” wheel base for cosmetic reasons. I fabricated what was to be the pivot points for the front portion and c-clamped them at the back of the roller frame. That allowed me to temporarily connect the front and rear sections and measure where the front axle had to be located to give me the correct wheel base. I felt the bottom section of the pivot would carry the majority of the loading so I made both the front and rear connections at the bottom rather “beefy”. On the front section of Artie I, for the bottom connection I cut a ¾” by 3” slot all the way through the center of a 2” by 2” section of square tubing. I slid the Category 2 end through the slots and welded it in place. (The picture was taken after the completion of the project.) You can’t see in the picture, but the Category 2 end goes all the way through the tubing and is welded on both sides.
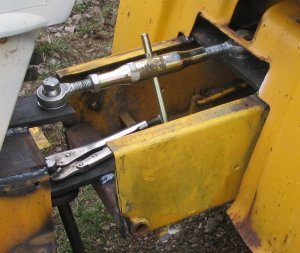
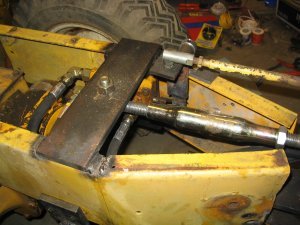
For the top connection I again used a length of ½” by 3” flat to run across the top of the frame. I welded another section of ½” by 3” in the center extending rearward. I drilled a 5/8” hole in this section to connect the end of the third link. The hole in this section and the hole in the Category 2 end were lined up vertically so that the front and back halves of Artie I would pivot correctly. (The picture illustrates the connections but was taken later in the process. In the picture the front connections are welded in the final position.)
With everything either tacked in position or c-clamped in position, I could make the measurement to determine where to mount the front axle. Since the frame of the 1650 is a channel shape except where the rear end is bolted, I cut out the bottom flange of the channel at the new location. I marked and drilled the holes for mounting the rear end at this position.
After the rear end was bolted in place, I set the engine in the frame and temporarily mounted fenders. I attached the front grill housing and hood as well as the pedestal. I mounted the seat on the rear section. I wanted to see what Artie I looked like cosmetically.
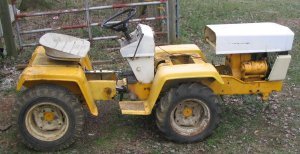
Although it wasn’t too bad, it looked to me that the front section extended too far over the front axle. (In the picture, notice the distance from the front of the pedestal to the rear of the hood. It measured almost 2 feet long.) I had my son look at it, and he said it just didn’t look good. The front end extended too far out over the front axle. So, I disassembled the entire front section of Artie I and moved the axle as far forward as possible. The limitation was the drive shaft to engine connection; it had to be kept to a reasonable length. After cutting out more of the bottom flange, drilling new holes to mount the axle, and mounting the axle, I reconnected the front and rear sections of Artie I. That allowed me to measure how much I had to shorten the frame to again get the correct wheelbase. The frame had to be cut off and the two pivot points had to be reattached. When I finished all that I again reassembled everything to see what it looked like. I had managed to shorten it about 5 inches. Unfortunately, I didn’t take a picture of this second iteration. When my son looked at it, he said it looked a lot better, but still just wasn’t right.
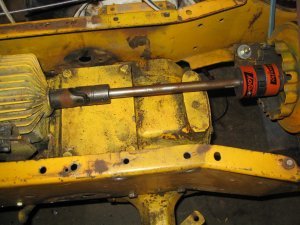
After a lot of thought, I decided to completely change my approach to the front design. The only way I could see to further shorten the front end was to reverse the axle; i.e., let the hydrostat extend to the rear. This meant the engine would also have to be turned around so that it would drive the hydrostat the correct direction, and the ring gear in the rear end would have to be “flipped” to the opposite side to make the rear end turn in the correct direction. Since the drive shaft for the hydrostat extends out what’s normally the rear, it made an easy connection point to drive the hydrostat. Since the room around the drive shaft is limited, I had to use a universal joint on the connection to the hydrostat. To connect to the engine, I used a LoveJoy connector. I didn’t feel the LoveJoy connection would allow for as much movement of the engine as the rag joints they were replacing so I replaced the iso-mounts on the engine with solid mounts.
Now the limitation as to where the axle could be placed turned out to be the frame. The frame on the 1650 (as with other “wideframe” Cub Cadets) flares outward to accommodate the engine. I placed the axle as far forward as I could get it without cutting into the flared section. Again, as before, moving the axle involved removing a section of the flange and drilling new holes to mount the front axle. The front and rear sections of Artie I were again temporarily connected, and I measured the amount that had to be cut off the frame to give the 43 inch wheelbase. The modification allowed me to shorten the frame an additional 7 inches.
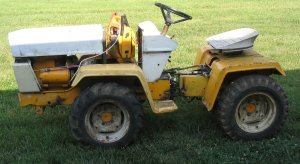
Notice in the picture that the distance from the rear of the hood to the front of the pedestal is now 12 inches.
An unexpected advantage of reversing the front axle was the location of the hydrostatic controls. On the 1650 the control handle is on the right hand side of the pedestal, and the control on the hydrostat is located on the left side of the tractor. When the axle was reversed, the hydrostat control was on the same side as the control handle on the pedestal. Using a portion of the control linkage from the 1650, I fabricated a linkage to go directly from the pedestal control down to the hydrostat. It doesn’t work quite as well as the original setup. It has plenty of control for the forward motion, but it won’t fully engage to produce a fast reverse. Artie I has reverse, but it isn’t too fast.
The next part of the project was the steering. While I could purchase a power steering unit, I wanted the challenge of using the auxiliary hydraulics from the 1650. The easy way would be to mount the 1650 valve where it could be controlled by a linkage from the steering lever. Then turning the steering wheel would move the steering lever which would activate the hydraulic valve. The valve would be used to control a hydraulic cylinder which would contract and expand to steer Artie I. But this setup wouldn’t be “true steering”. The operator would have to just move the steering wheel enough to activate the valve and continually return the steering wheel to the neutral position to stop the turning action. I wanted a system that would behave as steering is supposed to work; i.e., the operator would have to continue to turn the steering wheel in the direction required for the turn.
To permit “continuous” steering would require that the control valve would continually release as Artie I pivoted for the turn. Then the operator would have to continue to turn the steering wheel rather then returning it to neutral. This meant that the hydraulic valve would have to be mounted on the rear section of Artie I.
The pictures show where the hydraulic valve is mounted on the rear section of Artie I as well as the drag link that connects to the front steering arm. Notice in the pictures that I had to add a pivot arm from the end of the drag link to the chain link that connects to the hydraulic valve. This pivot arm accomplished two things. First, it permitted proper alignment for the drag link from the steering arm on the front section of Artie I to the pivot arm on the rear section of Artie I. Secondly, it amplified the movement of the drag link. Previously, I had determined that it required a lot of rotation of the steering wheel to activate the hydraulic valve. By using a shorter distance for the top connection of the pivot arm then the connection at the bottom, it multiplied the movement of the steering arm and produced almost instantaneous steering wheel response.
Now the steering works something like this. Let’s assume we’re making a left hand turn. As the operator turns the steering wheel to the left, the steering arm pulls the drag link forward. The drag link pulls the top of the pivot arm forward moving the bottom of the pivot arm backward activating the control valve. The control valve sends hydraulic fluid to the cylinder causing Artie I to pivot left. As Artie pivots left, the distance between the steering arm and pivot arm decreases and releases the hydraulic valve. To continue turning left, the operator must continue turning the steering wheel. Turning right is obviously similar except the steering arm pushes rather then pulls and the distance increases rather then decreases.
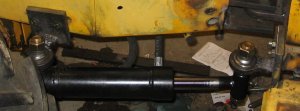
The only other problem I encountered with the steering was a pretty simple fix. Again, trying to utilize as much as I could from the 1650, I originally used the hydraulic cylinder that came with the tractor. When I mounted the cylinder and tried out the steering it was too quick. The small diameter and short stroke of the cylinder caused a very rapid, jerky response. I ordered a new larger cylinder (2” diameter) with a longer stroke (6 inches). Since the cylinder extended from the front section of Artie I to the back section, there had to be provision to allow for twisting as well as turning as Artie I maneuvered over uneven ground. I welded three point ball ends to flat irons that could be c-clamped to the frame of Artie I so I could adjust them to get a reasonable turning radius. Once the correct position was established, they were bolted in place.
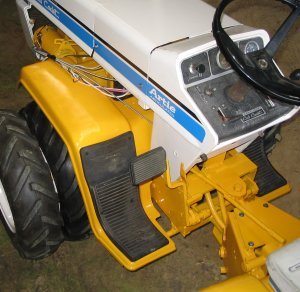
Most of the other items were mainly cosmetic. I did make new mounting holes and move the front grill back as far as possible. The steering wheel seemed to extend too high above the pedestal. You can see how high it was in some of the earlier pictures. I cut out a section of the steering tube as well as the steering shaft and welded the pieces back together to get the look I wanted. The rear fenders were mounted in the original mounting holes and cut off just above where the foot rests used to be located. The front fenders (from the 1650 roller) were reversed and the foot rests were shortened. Since Artie I had been designed to have a low profile, the seat was mounted on the rear section with foot rest on the front section. A friend provided rubber foot pads from a newer model Cub Cadet to use on the front section.
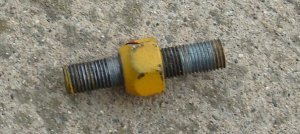
I made my own duel wheel spacers since I had experience making spacers for several other projects. For each spacer, two 5 3/8” diameter disk were cut from 3/8” flat stock on a CNC mill. The mill drilled all the stud locations with a ¼” milling cutter and cut out a 2 1/2” diameter hole in the center. Again, my son looked at the tractor and decided on a proper spacing between the wheels. I cut a piece of 2 1/2” O.D. diameter steel tubing long enough for the spacers to be 6” inches long and welded one disk on each end. On one end, I drilled the ¼” holes to the 25/64” and threaded each hole for a 7/16 – 20 thread. On the other end, I just drilled a 7/16” clearance hole. I made my own lug bolts to attach the hubs to the inside wheel. I cut a piece of 7/16-20 all thread into 2 ¼” lengths. A lug nut was placed in the center of each of the 2 ¼” lengths and held in place by red Locktite.
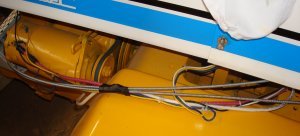
The battery was located in the original battery compartment in Artie I’s front fenders. Since the engine was now placed 180 degrees from its original position, the throttle cable had to connect from in front of the carburetor rather then coming from the rear as it was originally. That meant the throttle cable had to be run along the left side of the engine and around the front. Since the choke control is located on the left side of the dash, it was easier to run it along with the throttle cable.
When I started the project I had intended that I would end up with a 4 wheel drive vehicle. That’s still the plan. I made sure that there was room to run a driveshaft from the front hydrostat to the rear hydrostat through the center of Artie I. However, the project lasted a lot longer then originally anticipated. Remember that I literally redid the front end completely three times before my son thought it “looked right.” I had what I thought were more interesting projects to work on, and I was tired of working on Artie I. So, I removed the rear hydrostat, made a cap to cover the hole, attached the cap, painted Artie I and put the 4 wheel drive off until a later date. (I’m still working on those other projects and I still haven’t learned to take pictures as I go!!!) In the meantime, I hope you’ve enjoyed this description of all my trials and “do overs” and find it useful if you plan to build an articulated Cub Cadet.
