Creating Mini Projects
I have displayed mini projects at local antique tractor shows for the last several years. It is unbelievable how many people come up to me and comment either that “You are truly an artist” or “You are a really creative person”. People that know me would laugh to hear me referred to as an artist. To build a mini project, I don’t think you have to be an artist. You have to be able to observe the most distinctive characteristics of the article you’re trying to miniaturize and duplicate those characteristics in miniature. And, as far as being creative, I’m not at all creative in the sense that these show goers are referring. These nice individuals are implying that I have come up with some very creative projects. In my thinking the projects are not creative. It’s the process that’s creative rather then the final product. And those two things are what this article is about; being observant and creative.
Note: As you read through this article, you’ll find that I’ve presented several questions about creating and fabricating different aspects of these mini-projects. You’ll find more detailed explanations of the answers to most of these questions under the Special Projects sections of this website.
Mini New Holland Hay Rake

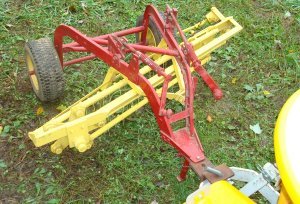
It seems like every spring the rains keep us from mowing several sections of our yard. The grass gets so tall that it has to be removed by hand raking when the ground dries to the point that the grass can be mowed. Since our yard is rather large, it didn’t take long to realize there had to be a better way. Although there are several things that can be purchased for this purpose (lawn sweepers, yard vacs, etc.), I decided I wanted to build something to do the job. Growing up my job was to bale the hay. Since I’d spent a lot of time watching a New Holland rake across the field while I was baling hay, that’s what I decided to build.
Observe: Here’s where one needs to be observant rather then an artist. What are the characteristics of a New Holland rake that stick out in your mind? Several readers may not know what a New Holland rake looks like or how it operates, but if you do, what comes to mind? To me, the main characteristic is the two red beams that run from the hitch to the rear wheels. The second characteristic that sticks in my mind is the yellow basket and rake bars hanging below the two main supports. And, what other minor characteristics do we want to add? The two handles that raise and lower the rake basket would be a nice touch.
Create: Ok, now I’ve determined the main characteristics I want to duplicate. How do I do it? How do you successfully, bend two small channels at such a sharp angle while preventing twisting, warping and stretching? I used an acetylene torch, a bending fixture made out of two eight inch channels, a really big hammer and a welder. And, once that’s decided, how do you get five bars to rotate about a center axis that’s at a sharp angle to the bars? I designed and built my own connector for each end of the bars. And what finishing touches should be added to make it appear more like its big brother? I added the handles.

Finishing Touches: I added the handles and a realistic looking hitch and jack.
Mini 560

I first saw a Mini-560 on a Cub Cadet forum about 11 years ago and decided I wanted to build one. Since my Uncle has and uses an IH 560, I went to visit him and took some pictures and measurements.
Observe: What is distinctive about a 560? To me it was the large red hood above the white side panels and grill. My point here is that if you just took an unmodified Cub Cadet, painted the hood red, added some white side panels and painted the grill white, people would recognize it as a Mini 560. Additionally, it helps if the front section has a “wide” look and a distinctive front grill with the horizontal bars. With these major characteristics, any mini tractor can be made to resemble an IH 560.
Create: The Mini 560 was the easiest “mini” project that I have undertaken. If you want to make a mini tractor, the 560 is a good place to start. The only real creativity involved was in how to fabricate the hood, side panels and front grill. I made a three piece hood using a shear, brake and home made roll bender. The side panels were made using the shear and brake, and the front grill is a bolt in item. Once I finished the basic tractor and decided to add a 3 point hitch, fabricating and mounting the hitch did require some ingenuity and creativity.

Finishing Touches: I added a hydraulic system and 3-point hitch.
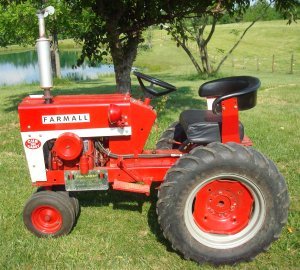
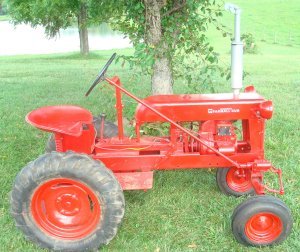
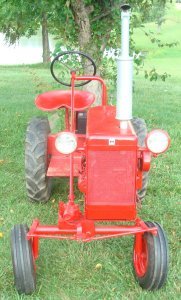
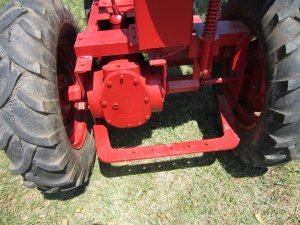
Mini H


The first tractor I ever drove was an H Farmall. My Dad told me that I was only 4 years old when I drove an H pulling a hay wagon as he and my Grandfather picked up bales of hay. The H was an obvious choice for a miniature.
Observe: The distinctive characteristics of an H are the orientation and positioning of the steering wheel and the light bar. I’ve seen a lot of miniature H’s that consisted of a lawn tractor with no more then the correct looking steering wheel and lights. Of course an H should have a tricycle front end, and a long narrow looking hood helps.
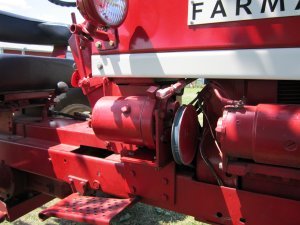
Create: The steering on the Mini-H required the most “head scratching”. How do you get the correct steering ratio as well as a steering shaft about 20 degrees off horizontal connected to a vertical shaft extending upward from the front spindle? I used a couple universal joints, a cub cadet steering box and a final chain drive. Additionally, fabrication of an authentic looking hood, grill and gas tank requires more “figuring out.” I used the home made roll bender and learned how to work with fiberglass.


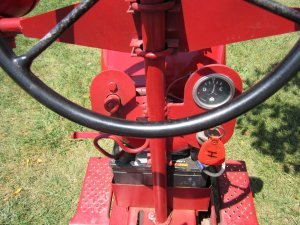
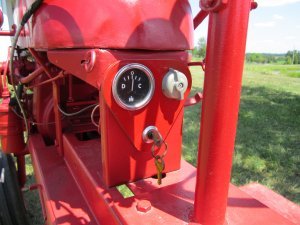
Finishing Touches: I added a correct looking front grill, swinging drawbar and instrument panel. I removed the original starter/generator and added and electrical starter to make the whole tractor have a “thinner” appearance.
Mini Cub
Observe: The International Cub is so distinctive that it is an easy concept to miniaturize. Simply offset the frame and engine to the left side, place a steering wheel on the right side and you have yourself a Mini Cub.
Create: But how do you do it? How do you get the front and rear axles to extend out far enough to the right to allow for comfortable placement of a seat and steering wheel? For the rear end, I shortened the left housing and axle. I made an extension for the right axle and used a channel section to extend the axle housing. For the front axle tube I used black iron pipe for the cross tube, smaller steel tubing for the spindle tubes and just got really lucky with the assembly. How do you get the foot controls to the right side? I flipped the pedal from the left side and cut and welded it back to the correct configuration. And, how is the steering going to work? I used a modified Cub Cadet steering box. There are a lot of other small things that can be done, but if you can get the offset, you have yourself a Mini Cub.
Finishing Touches: I added a correct looking drawbar and instrument panel.
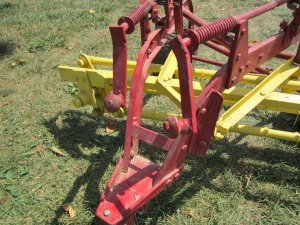
Accessories
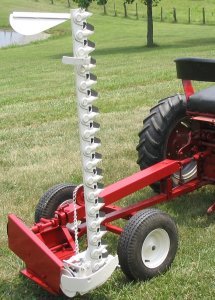
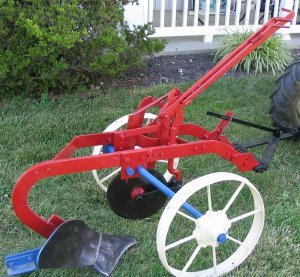

After fabricating the Mini 560 and Mini H, I felt they needed some realistic looking equipment to go with them. For the Mini 560, I originally made a pull type sickle bar mower. But I later built a mounted sickle bar mower to make for easier transport to shows. I made a pull type plow for the Mini H. My plan is to make a belly mounted disk plow for the Mini Cub as soon as I locate a 14 inch diameter disk.
Observe: I’ll lump these three accessories together in this discussion. For the plow, I think the distinctive characteristics are a moldboard located behind the wheels and levers extending above the frame. Just the presence of the sickle bar and knife are distinctive parts of a mower. Additionally, for the pull type mower, it’s the long tongue and PTO shaft with the main body of the mower located behind the wheels. For the mounted mower, it’s the semicircular arch for the 3-point hitch connection that makes for an IH mounted mower.
Create: The plow was the hardest to create. There are a lot of curved and angled sections. How do you bend the pieces to make the main frame and axles? For the frame, I used thinner sections of metal, bent them and then welded them together to get the desired thickness. The axles where made from cold rolled steel bent using an acetylene torch. And, once the frame is done, how do you mount the levers to properly adjust the plow? One of the levers I used had to be extended and the other shortened.
For both mowers, how do you mount the sickle bar mechanism to the main frame of the mower so that it can be raised and lowered? And how do you account for the torque generated by the bar when it is in the lowered position. Both mowers were made using Haban mowers so I used the method Haban used for raising and lower the sickle bar. Since I didn’t want to destroy the integrity of the Haban mowers, I created a mounting system that permitted the original portion of the Haban mower to be a bolt on connection. I created the arch section for the 3-point using end sections of an old iron bed frame welded together.
I appreciate the detail that many collectors put into their creations. Having worked on these projects I realize the time and effort that they’ve expended. I have a lot of admiration for theses individuals and in no way want to minizmize their amazing work or valuable contribution to the hobby. But my point with this article is that if you don’t have the time or skill required with these detailed creations, you can enjoy a lot of success by simply being observant in what you see and creative in how you produce it.
I hope this article gives you some insight into how I go about creating a mini version of a larger item. As always, if you have any questions or comments, you can contact me through this website.
